I hope you all find this as helpful for your family as it is for ours!
chores.pdf |
Cruzin' Thru...Life, Love and Health |
Follow me:
|
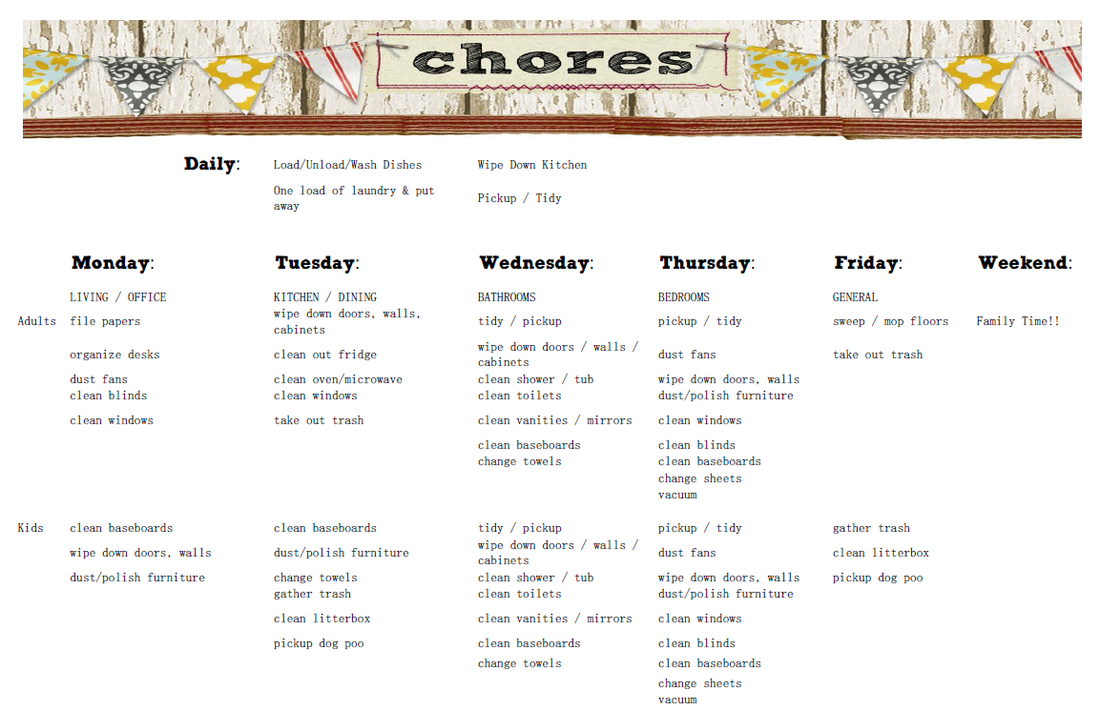
Today, I am uploading for all of you, the chores list that I created for my family. I started by listing which chores need to be completed daily. I've also made different tasks for each day, and designated certain chores to the adults and others to the kiddos. This seems to really work well in our home, as it holds everyone accountable for how clean and tidy our home is! I hope you all find this as helpful for your family as it is for ours!
© Cruzin' Thru | 2014
0 Comments
So, I've been telling myself for quite a while that I'm going to work on putting a family household binder together... like literally I had printables saved to my computer from this past April. Well, there's definitely no better time than the beginning of the year to get it done! So, here is our family household binder and family emergency binder and let me tell you, I love how they look! For our family household binder, I was able to pull most of the printables that I used from the following sites: I Heart Organizing, iMom for the 2014 monthly calendars, Organizing Home Life, and DIY Home Sweet Home. I also created some of my own printables including the cover sheets, chores, date/family night ideas. For the sections, I included: Faith: includes Bible Emergency Numbers for the days when I need more of God's influence, some prayers that I found on iMom as well as some motiviational quotes Calendar: Each month has it's own calendar, followed by budget and then several weekly planners Date Night/Family Fun Ideas: pretty much speaks for itself. I plan to scour sites like groupon to see if there are any other ideas that we can use. Finances: includes an envelope for receipts, bank acct info, bills. Cleaning: has my own home-made chores list as well as an in-depth spring cleaning checklist, found here. Health: has medications, check-ups, medical/dental insurance info; hope to expand and put family favorite and healthy recipes Maintenance Schedules: for home and autos Home Projects: because Lord knows we're always doing some sort of home improvements in our home Misc: has emergency information, baby sitter information, packing checklists, shopping lists Contacts: pretty self explanatory That is, in a nutshell our household planner. For our emergency binder, I found a great comprehensive list from Simply Fresh Designs that has literally everything that you might need to grab in the event of a family emergency. Plus, it helps bring about discussions of what everyone needs to do, where they need to go in the even of an evacuation.
My binder is arranged into the following five categories: Vital Docs: Birth certificates, passports, immunization, marriage certificates, adoption/legal papers, ID kits for each family member and pet (find those here) Insurance Docs: Homeowners & auto policies, health insurance information, home inventory (including a DVD of personal belongings) Financial Docs: Bank acct info, retirement info, work/tax docs, title to property/autos/etc. Personal: Emergency contact info and family history documents Evacuation Info: home escape route/meeting spots, grab and go list, 72 hr emergency kit, car emergency kit, etc. I feel like I have a really good start on this binder as most of the things are already in the same area, but it will be nice to have everything in an easy, grab-and-go binder. Please note, that I recommend putting copies of originals in this binder and storing original docs in a fire-proof and water-proof safe. © Cruzin' Thru | 2014 Whew! So glad to finally be done with my baking - for now! I found a couple of recipes on Pinterest which turned out phenomenally as well as my grandma's sugar cookie recipe, all for our department Christmas party tomorrow. Who needs frosting when the cookies just melt in your mouth?! I am absolutely pooped, but will post the recipes and more pics tomorrow!
Will be doing more baking for my son's Christmas party at school and also for our family Christmas, but for now this is it! Please let me know what is your favorite baking/dessert for the holidays! Merry Christmas! © Cruzin' Thru | 2013 I finally am able to post the Christmas wreath that we made. Everything that I used I purchased from Hobby Lobby, and it was all less than $20!
I used a large grape wreath, picked up several different ribbons in varying colors, widths and patterns, some additional ornaments/decor and that was it! First, plug in your hot glue gun. Second, I just laid things out to figure how I wanted it to look. I started by wrapping the thick red/white ribbon around the wreath and glue down the cut ends on the back of the wreath. Next, I placed and glued the green curly pieces followed by the ribbons. I cut the ribbons at varying lengths and simply tied each ribbon in a knot. I then hot glued the red ornament and the Noel onto the wreath, and hung the cross at the center of the wreath. I am thinking about picking up some additional ornaments and decor to add to the wreath, but love how it looks so far! Enjoy and please share pics of your completed wreaths! © Cruzin' Thru | 2013 I love all of the different Christmas Advent calendars, but I haven't really found 'the one' that I wanted for our family. So... I made my own! First, I didn't want something that was huge and would take up a lot of storage space and I didn't want to put any holes in the wall. So, I purchased some small clothes pins and stick-on magnets from Hobby Lobby. My kids helped with this part and painted the one side of the clothes pins in red, white or green. Once dry, they trimmed the stick-on magnets and put on the back side of the clothes pins. I used these to hold the daily packets which are located on the side of our refrigerator but is still a very focal point in our kitchen! Next, I used four different Christmas-inspired scrapbook pieces of paper, cut into six pieces to make the 'envelopes'. Simply fold in half and glue so it makes an open ended envelope. While those were drying, I created and printed the numbers for each days packet as well as the 'Countdown to Christmas' title at the top of our calendar. I used a 1 1/2" circle punch to punch out the numbers, so quick and easy! Now, the most important thing to include in the calendar, for me, was the telling of Jesus' birth, in a way that is easy for our kids to understand the significance and importance. I found exactly what I wanted with this great {free!} printable from LovelyIndeed. I paired that with a great conversation question or Christmas activity to do. I found an equally great printable from Creative with Kids. I love the ideas including several that give back to the community, a lot of fun, family time activities! So each day has a meaningful study of the birth of Jesus as well as an activity or conversation piece! I feel that this will really reinforce the magic of the season, create beautiful and lasting memories, and it's something that our kids are already looking forward to! They keep asking when is December 1st, so they can open that first envelope! Below are the printables that I created. Please feel free to use for your own advent calendar! Seasons Greetings! © Cruzin' Thru | 2013
We have been busy getting our craft on! This is the first of three posts with all of our crafty fun!
I have seen so many cute ideas for Christmas decor with the word 'Joy' and have been looking forward to creating our own for a while. The fact that our kiddos were a huge part of the painting makes this all the more perfect to me! First off I did get most of my supplies from Hobby Lobby... Love love love that store! I used the cardboard letters for J and Y, and a wooden O that had a little more swirl-factor going on. Started off by painting the J and Y in red, and I ended up spray painting the O in white. Once the red paint had dried, the kids painted on the white dots. Meanwhile, I added just a thin layer of modpodge onto the white O and sprinkled a fine layer of silver glitter onto it. Once everything was dried, I cut a small green ribbon, looped through a silver bell and tied onto the O. Very quick, super easy Christmas craft and love that our kids helped out! © Cruzin' Thru | 2013 I was feeling kind of crafty this morning, thinking about a new fall centerpiece for our dining room table. I absolutely love all of the mason jar/vase centerpieces with candles, some sort of dried beans, leaves, etc! Well, I had everything on hand that I needed and truly only took me about ten minutes to put this together! I started with two mason jars, went to our back yard and gathered two handfuls of the fallen crepe myrtle leaves which are a beautiful red/orange color and layered those in the jars on the bottom. Next, I layered in some unpopped popcorn kernels and then added some cinnamon votive candles. I cut two very long pieces of twine and wrapped that around the candles as many times as they would, about four or five times, and tied in a bow. I have some burlap that I thought would be a great base, but also had this beautiful leaf and berry garland that I think looks so much better and really sets off the colors. I just love our new centerpiece and best of all it didn't cost me anything because I already had all of the supplies on hand! Woot woot! © Cruzin' Thru | 2013
I always, always, always feel like I have my Christmas lists scattered about on different pieces of paper, based on what was available when I thought of the gift I wanted to add to my list. Last year, I used the Gift Plan app and I really liked it - I still will use it for other things. But with the Christmas lists and how often I change my mind, and trying to make all of those changes on my phone - it gets a bit frustrating. So this year and to be more organized, I created this very simple printable Christmas List. I love how you are able to list out the gifts and stocking stuffers all in one spot. Also, for my kiddos we always use the following rule: A gift they want, a gift they read, a gift they wear and a gift they need. That's why I have those three groupings that have those reminders listed to the side of the gifts. Below is a pdf formatted file as well as a word formatted version - please feel free to use whichever version is easiest for you. Enjoy!
© Cruzin' Thru | 2013
I had the absolute best time planning my sister's baby shower! It started off a a "made in Texas" theme, but then transitioned into cowgirl/western theme with pinks, browns and cream colors. I made an initial/tulle wreath to hang in the nursery, a burlap penant flag with my niece's name, cute jarred M&M cookie favors... it was all too much fun, but I would do it again in a heart beat. We had some really great games, and it seems like everyone really enjoyed this co-ed shower because I was told that I would be recommended as an event/party planner - woot woot! May have found a new calling, LOL! © Cruzin' Thru | 2013
So by now you've probably realized that I am getting really excited for my sister's baby shower. I finished the nursery hanging yesterday and then enlisted my husband's help on these favors! I absolutely love how they turned out! Below are the instructions (for you to assemble the favors) and then the instructions to provide along with the favors. Ingredients 1 wide-mouth quart (4-cup) canning jars with lid and rings 1⁄4 cup sugar 1 1⁄4 cup M&M-brand chocolate candies 2 cups sifted flour, all purpose 1⁄2 teaspoon baking soda 3⁄4 cups brown sugar, packed 1⁄4 teaspoon baking powder Layering Instructions 1. Sift flour before measuring. Mix together flour, soda and baking powder. Layer flour mixture, brown sugar, granulated sugar and M&Ms candies in jar. Pack firmly after adding each layer. [Hint for FoodSaver brand vacuum sealer owners: use the jar sealing attachment to seal jars for longer storage.] M&M Cookies in a Jar Recipe (provide with favor) Empty jar of cookie mix into mixing bowl; blend thoroughly. Add 1/2 cup butter or margarine, softened, 1 beaten egg and 1 teaspoon vanilla. Mix until completely blended. Roll into 1-inch balls, and place 2 inches apart on ungreased cookie sheet. Bake at 375 degrees until edges are lightly browned, about 12 to 14 minutes. Cool on cookie sheet for five minutes, then transfer to wire racks. Makes 2 1/2 dozen cookies. For the tags, I created my own thank you with MS Word, printed on white paper. Then cut and added onto brown scrap book paper, punch a hole and tie around the jar with twine! Here are some pics from our 'assembly line' - just had to share! Enjoy! © Cruzin' Thru | 2013
|
AuthorHere you'll find my craft adventures, ideas and products. A lot of my 'ideas' come from Pinterest, and I love crafting and coming up with new ideas or twists. Archives
September 2015
Categories
All
|