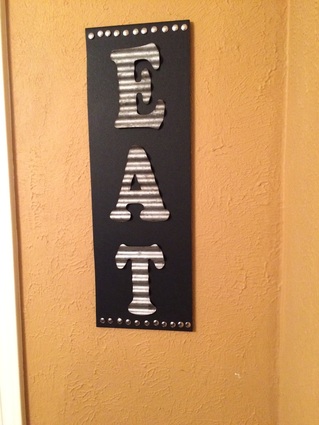
If you've been on any craft site, namely Pinterest, anytime in the past few months, I'm sure you've seen numerous "EAT" signs that people have been making. Some are large, some are lit, and they all look amazing! I've been wanting to make one for our dining room for a while and finally got it done! This project was so easy and literally took me about thirty minutes, including drying time, and I love the way it looks! Love the industrial look of the letters!
Hobby Lobby is my store, most everything is always on sale and if it's not, they've got a 40% off coupon on their app that is updated all the time! I've never walked out of Hobby Lobby paying full price for anything - so when you're on a budget when it comes to crafting, this is the perfect store and always my go-to. (Unless it's Sunday, then I'll either go to JoAnn or Michael's...)
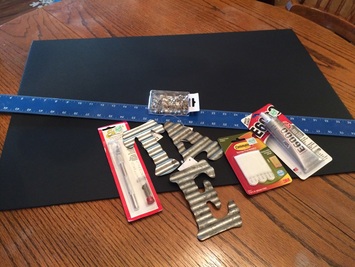
The supplies didn't cost much at all. The letters were $1.50 ea I think, the glue was $3.99, the poster board (yes, I said poster board!) was $3.99, thumbtacks were $1.99 and the command strips were $3.99. I already had the exacto knife and the yardstick. So, for about $20 I had a cute "EAT" sign to hang in my dining room.
Hobby Lobby is my store, most everything is always on sale and if it's not, they've got a 40% off coupon on their app that is updated all the time! I've never walked out of Hobby Lobby paying full price for anything - so when you're on a budget when it comes to crafting, this is the perfect store and always my go-to. (Unless it's Sunday, then I'll either go to JoAnn or Michael's...)
The supplies didn't cost much at all. The letters were $1.50 ea I think, the glue was $3.99, the poster board (yes, I said poster board!) was $3.99, thumbtacks were $1.99 and the command strips were $3.99. I already had the exacto knife and the yardstick. So, for about $20 I had a cute "EAT" sign to hang in my dining room.
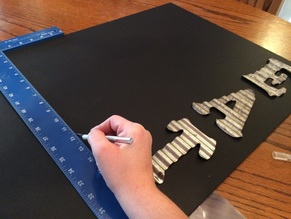
I started by arranging the letters on the poster board to visualize how large I wanted the poster to be. I knew I wanted it to be vertical and skinny.
Next, I used my straight edge and exacto knife to cut the size that I wanted. Be sure that you put something between the poster and your table so that you don't accidentally cut into your table!
Once the board was cut out, I again arranged the letters on the board and worked on the spacing. Once I had them how I wanted them, I used the E6000 glue to attach them to the board. When I opened up the tube of glue, the smell instantly brought me back to the years when I used to help my grandparents make their crafts that they would sell! Ahh, sweet memories!
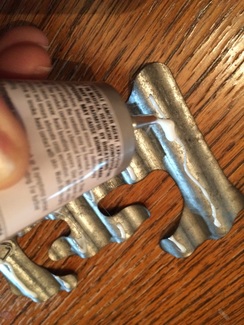
Anywhoo, I digress. The letters are made of some sort of industrial or galvanized metal material and have ridges and valleys. In order to make the letters stick, I turned the letters up side down and placed a thin line of glue on each of the ridges, so that when I turned it back over, those ridge would be touching and adhere to the poster board.
Anywhoo, I digress. The letters are made of some sort of industrial or galvanized metal material and have ridges and valleys. In order to make the letters stick, I turned the letters up side down and placed a thin line of glue on each of the ridges, so that when I turned it back over, those ridge would be touching and adhere to the poster board.
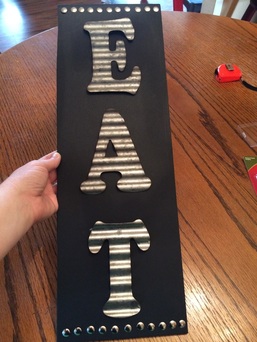
Once all of the letters were glued on, I used a tape measure (could also use a ruler - my yardstick was too large and cumbersome for this part) to draw a straight line at the top and bottom of the poster. I simply started pushing the thumbtacks into the line and eyeballed the spacing. It's not perfectly straight, but that is alright by me! I still love the way it looks - imperfectly perfect!
I did not worry about gluing them to the poster, but you could if you wanted to. Just be sure it's a little bit so that the glue doesn't seep out the sides!
I didn't get a picture of it, but I did put some books on top of the letters for about ten minutes to help them get a good hold on the poster board.
Lastly, I turned the poster board upside down and added two command strips to the back. As light as this project is, the command strips make much more sense than pounding holes into the wall to hang it on. Plus it's much easier to remove and doesn't leave any holes when I'm through with it!
Remove the backings from the adhesive side and press to the wall! I love my little sign and think it makes a great addition to our dining room! I'm really digging the industrial look and looking forward to redecorating my dining room and possible kitchen in this style!
© Cruzin' Thru | 2015
Remove the backings from the adhesive side and press to the wall! I love my little sign and think it makes a great addition to our dining room! I'm really digging the industrial look and looking forward to redecorating my dining room and possible kitchen in this style!
© Cruzin' Thru | 2015
 RSS Feed
